HubBox Integration for Shopify Plus
Welcome, Shopify Plus merchants! This guide walks you through installing and configuring the HubBox Local Pickup app using Shopify's Checkout Extensibility framework. This approach embeds HubBox directly into your checkout flow, giving you flexible placement options and access to advanced features.
View HubBox on Shopify App Store
For stores on Basic, Shopify, or Advanced plans, refer to the Shopify (Basic & Advanced) documentation, as the integration method differs significantly.
Key Shopify Plus Advantages
- Checkout Extensibility — Allows apps like HubBox to add UI components (App Blocks) directly into specific checkout steps.
- Shopify Functions — Enables custom backend logic for product eligibility validation and dynamic shipping rate filtering.
- Enhanced Customisation — Provides greater control over checkout appearance and user experience compared to non-Plus plans.
Prerequisites
Before you begin, ensure you have the following:
- A Shopify Plus store.
- Admin access with permissions to install apps and customise the checkout.
- A Google Maps API key.
- An active agreement with the HubBox Sales or Integrations team to license your account within the app.
How It Works
The HubBox app uses Shopify's Checkout Extensibility framework as follows:
- App Installation — You install the HubBox app from the Shopify App Store.
- Checkout Customisation — Using the Shopify Checkout Editor, you add the HubBox App Block to your desired checkout step (typically the Shipping step). This block renders the HubBox UI, such as toggles or buttons for choosing between Home Delivery and Pickup.
- Configuration — Settings in the HubBox App Admin Panel control carrier networks, map appearance, filtering behaviour, and other features.
- Customer Interaction — The customer uses the HubBox App Block to select a pickup option and choose a location via the map widget.
- Data Update — Upon selection, the app uses Shopify's APIs to update the shipping address to the chosen pickup point and trigger any configured Delivery Customisation Functions for rate filtering or validation.
- Order Tagging — After the order is placed, the app uses the Admin API (via a generated token) to add tags and note attributes to the order for fulfilment identification.
Installation & Initial Setup
Install the App
- Go to the HubBox Local Pickup page on the Shopify App Store..
- Click Install.
- Follow the prompts in your Shopify admin to grant the necessary permissions and complete the installation.
Account Licensing & Activation
- New HubBox Clients — If you have not yet finalised terms, contact the HubBox Sales team.
- Existing Agreements — After installing, the HubBox Integrations team will reach out to activate or "License" your account within the app's backend, enabling full configuration access.
Configure Shopify API Access & EventBridge Integration
For the HubBox app to add identifying tags and pickup details to orders after they are placed, it requires secure access to your Shopify Admin API and a connection to Amazon EventBridge for real-time event notifications. Your HubBox Integration Manager will set up your EventBridge integration.
Configuring the HubBox App (Admin Panel)
Once the app is installed and your account is licensed, navigate to Apps > HubBox Local Pickup in your Shopify Admin to open the HubBox App Admin Panel.
Configure the following sections:
| Admin Panel Option | Description |
|---|---|
| Select Courier Service | Choose which carrier networks (e.g., UPS, DPD, DHL) to offer for pickup. |
| Change Region | Select the geographic regions or countries where these services should be available. |
| Map Settings - Google Maps API Key | Enter your Google Maps API key. Required to display pickup locations on the map. |
| Map Settings - Map Center Coordinates | Set the default map centre location. |
| Additional Settings - Shipping rate filter | Enable to show or hide shipping rates based on whether the customer selects Home Delivery or Pickup. |
| Additional Settings - Pickup options | Select which shipping rates are available to customers who choose a pickup location. |
| Additional Settings - Home delivery options | Select which shipping rates are available to customers who choose home delivery. |
| Additional Settings - Orders Token | Paste the orders token generated in Step 3. |
| Additional Settings - Payment methods filter | Install if required to hide the pickup option for certain payment methods (e.g., Apple Pay, Shop Pay, Klarna). |
| Customisation - Discount Code | Set a discount code to be automatically applied when a customer chooses a pickup location. |
| Customisation - Pickup point appearance | Select how the pickup UI is presented: Toggles (2 radio buttons), Buttons (2 buttons), or Shipping method (pickup as a shipping rate). |
| Customisation - Pickup options (Shipping method UI only) | Select which existing shipping rates are used as pickup options. |
| Customisation - HubBox Carrier Service (Shipping method UI only) | Create new pickup shipping rates via HubBox's Carrier Service. |
| Customisation - Configure custom shipping method (Shipping method UI only) | Set the name, price, and speed of pickup shipping rates. |
| Customisation - Local Pickup Shipping Prices (Toggles and Buttons UI only) | Add the copy displayed to customers in the Toggles and Buttons UI. |
| Customisation - Shipping Method Titles (Toggles and Buttons UI only) | Add the titles used in the Toggles and Buttons UI. |


Launch Experience Configuration
You can choose how the pickup option is initially presented to customers:
- Standard App Block (Toggles/Buttons — Default) — Add the HubBox App Block via the Checkout Editor. This renders UI elements (toggles or buttons) allowing customers to choose between Home Delivery and Pickup before shipping rates are shown.
- Shipping Rate Method — Configures HubBox to present pickup options as distinct shipping rates within Shopify's standard shipping methods list. You must add the HubBox App Block to the shipping method section via the Checkout Editor.
Map Settings (Google Maps API Key)
The HubBox app requires a Google Maps Platform API key to display the pickup location map.
Generate Your API Key
Generate an API key from the cloud.google.com/maps-platform/. Ensure the Maps JavaScript API and Places API are enabled, and apply appropriate security restrictions (e.g., HTTP referrer restrictions).
Add the Key to HubBox
- Copy the generated API key.
- Paste the key into the Map Settings section of the HubBox App Admin Panel.
- Optionally, set a default map centre latitude and longitude.
Google Maps API includes a generous free tier, but high usage may incur costs. Review Google documentation on pricing before going live.
Shipping Rate Filtering (Toggles or Buttons Launch Experience)
When using the Toggles or Buttons launch experience, you may need to filter the shipping rates shown after a customer selects Home Delivery or Pickup. This is particularly important if you use multiple carrier partners, as you can only ship to a carrier's network locations using that same carrier.
This functionality uses Shopify's Delivery Customisations, powered by Shopify Functions. The HubBox app provides an interface in its admin panel to configure filtering rules. Saving these rules creates or updates a Shopify Delivery Customisation Function that runs during checkout to dynamically filter the rates shown.
Enable the Shipping Rate Filter
In the HubBox App Admin Panel, go to Additional Settings and enable the Shipping Rate Filter.
Configure Pickup Options
Select only the shipping rates (e.g., "Pickup Standard", "Pickup Express") to show when a customer chooses Pickup. Select All if no filtering is needed.
Configure Home Delivery Options
Select only the shipping rates (e.g., "Standard Delivery", "Express Delivery") to show when a customer chooses Home Delivery. Select All if no filtering is needed.
Shipping rate filtering is generally not required when using the Shipping Rate Method launch experience.
Payment Methods Filter
This feature allows you to hide specific payment methods after a customer has selected a HubBox pickup option. Some express checkout options (such as Apple Pay, Amazon Pay, or Google Pay) may have flows that conflict with or bypass the steps required to confirm a pickup location. You may also have policy reasons to prefer standard card payments for pickup orders.
Open the Payment Methods Filter
In the HubBox App Admin Panel, locate the Payment Methods Filter section. You will see a predefined list of common payment methods (e.g., Apple Pay, Google Pay, Shop Pay, Amazon Pay, PayPal, Klarna, Venmo).
Select Methods to Hide
Select the payment methods you want to hide when a customer has chosen a HubBox pickup delivery method. Leave any methods you want to remain available unselected.
Save
Click Save. When a customer selects a HubBox pickup rate and proceeds to payment, any methods you selected to filter will not be displayed.
Adding the App Block to Checkout
Toggles or Buttons Launch Experience Shipping Method Launch ExperienceOpen Checkout Settings
Go to Settings > Checkout in your Shopify Admin. In the Checkout Customisation section, find your current live checkout profile.
It is recommended to click Duplicate to create a copy for testing before modifying your live checkout.
Open the Checkout Editor
Click Customize next to the checkout profile you want to edit. This opens the Checkout Editor.
!cdn.hub-box.com/console/shopify/checkout-customization.png
Add the HubBox App Block
In the left-hand sidebar, click Add app block and select HubBox Local Pickup from the list.
Position the Block
Drag and drop the HubBox block in the left sidebar to position it at the top of the Shipping section.
!cdn.hub-box.com/console/shopify/extension-positioning.png
Save and Publish
(Optional but recommended for Shop Pay) In the right-hand settings panel for the HubBox block, check Include app in Shop Pay to make HubBox options available within the Shop Pay accelerated checkout flow.
Click Save (top right). Once tested (see the #testing-the-integration section), click Publish to make the checkout profile live.
Open Checkout Settings
Go to Settings > Checkout in your Shopify Admin. In the Checkout Customisation section, find your current live checkout profile.
It is recommended to click Duplicate to create a copy for testing before modifying your live checkout.
Open the Checkout Editor
Click Customize next to the checkout profile you want to edit. This opens the Checkout Editor.
!cdn.hub-box.com/console/shopify/checkout-customization.png
Add the HubBox App Block
In the left-hand sidebar, click Add app block and select HubBox Local Pickup from the list.
Position the Block
Drag and drop the HubBox block in the left sidebar to position it inside the shipping rate section.
!cdn.hub-box.com/console/shopify/extension-positioning-shipping-method.png
Save and Publish
(Optional but recommended for Shop Pay) In the right-hand settings panel for the HubBox block, check Include app in Shop Pay to make HubBox options available within the Shop Pay accelerated checkout flow.
Click Save (top right). Once tested (see the #testing-the-integration section), click Publish to make the checkout profile live.
Implementing Advanced Filtering & Eligibility
Checkout Extensibility supports powerful validation using Shopify Functions — small backend code snippets deployed to Shopify.
Configuring Product Eligibility Rules
You may need to prevent the HubBox pickup option from appearing when a customer's cart contains items unsuitable for pickup delivery. This is important for items that exceed carrier size or weight limits, are hazardous, perishable, high-value, restricted, or cannot be fulfilled via pickup for other business reasons.
For general guidance on which product types to exclude, refer to the /docs/product-eligibility.
How It Works on Shopify Plus
Product eligibility is managed via a flexible rules engine configured by the HubBox Integrations team within your HubBox account settings. These rules evaluate the customer's cart during checkout. If the conditions for hiding pickup are met, the HubBox App Block and/or pickup shipping rates are automatically hidden ("bailed out") for that checkout instance.
You need to clearly define your eligibility criteria (e.g., product tags, SKUs, collections, weights, prices, countries that should exclude pickup) and communicate these to your HubBox Integrations Manager or Client Success Manager. The HubBox team will then configure the corresponding rules in the backend.
Understanding the Rules Engine
The configuration involves defining one or more Conditions combined by a logical Operator (AND or OR) within a bailout rule.
Each condition specifies:
key— The data point to check (e.g., product tags, cart total, customer country).operator— The comparison type (e.g.,in,equals,less than,greater than).value— The value(s) to compare against (e.g., a list of tags, a country code, a price threshold).negate(optional) — Set totrueto invert the condition (e.g., "NOT equals US").
If the combined result of all conditions is true, the HubBox pickup option is hidden for that checkout.
Common Eligibility Configuration Examples
Bailout by Specific Product Tag(s)Use case: Hide pickup if any product in the cart has one or more specific tags (e.g., "Oversized", "Hazardous", "Pickup-Excluded").
"conditions": [
    { "key": "|productVariants.product.|tags", "operator": "in", "value": ["Oversized"] },
    { "key": "|productVariants.product.|tags", "operator": "in", "value": ["Hazardous"] },
    { "key": "|productVariants.product.|tags", "operator": "in", "value": ["Pickup-Excluded"] }
],
"operator": "or"
Bailout by Customer Country
|productVariants.product.|tagschecks tags across all items in the cart.
Use case: Only offer pickup to customers shipping within specific countries.
"conditions": [
    {
        "key": "customerAddress.countryCode",
        "operator": "equals",
        "value": "US",
        "negate": true
    }
],
"operator": "and"
Use case: Only show pickup for US customers AND only if the cart contains a specific enabling tag (e.g., "HubBox-Eligible").
"conditions": [
    {
        "key": "customerAddress.countryCode",
        "operator": "equals",
        "value": "US",
        "negate": true
    },
    {
        "key": "|productVariants.product.|tags",
        "operator": "in",
        "value": ["HubBox-Eligible"],
        "negate": true
    }
],
"operator": "or"
Use case: Hide pickup for very low or very high value carts.
"conditions": [
    { "key": "cartSubtotalAmount", "operator": "less than", "value": 5000 },
    { "key": "cartTotalAmount", "operator": "greater than", "value": 100000 }
],
"operator": "or"
Bailout by Number of Items
cartSubtotalAmountis typically pre-tax/shipping;cartTotalAmountincludes tax and shipping. Values are in the base currency unit (e.g., pence for GBP, cents for USD/EUR).
Use case: Limit pickup to carts below a certain item count.
"conditions": [
    { "key": "productQuantity", "operator": "greater than or equals", "value": 3 }
],
"operator": "and"
Use case: Exclude pickup if the cart contains items from specific collections (e.g., "Furniture Collection", "Bulky Items Collection"). Requires Collection IDs.
"conditions": [
    {
        "key": "collections.|some.|collectionProducts",
        "operator": "in",
        "value": ["462329577784", "462329545016"]
    }
],
"operator": "or"
Bailout by Inventory Location StockYou can find Collection IDs in the Shopify Admin URL when viewing a collection.
Use case: Hide pickup if required stock is unavailable at the designated Shopify fulfilment location.
"conditions": [
    {
        "key": "|productVariants.inventoryLevel.12345",
        "operator": "less than",
        "value": 1
    }
],
"operator": "or"
Bailout by WeightThis checks current available stock. More complex reservation logic typically requires custom Shopify Functions.
Use case: Exclude pickup based on individual item weight or total cart weight exceeding carrier limits. Values must be in grams.
"conditions": [
    {
        "key": "|productVariants.weight",
        "operator": "greater than",
        "value": 15000
    },
    {
        "key": "cartTotalWeight",
        "operator": "greater than",
        "value": 20000
    }
],
"operator": "or"
Implementation Process
- Define Your Rules - Determine which products or cart conditions should prevent pickup from being shown.
- Gather Identifiers - Collect the required data points: product tags, Collection IDs, country codes, price/weight thresholds, and inventory location IDs.
- Communicate to HubBox - Provide your requirements to your HubBox Integrations Manager.
- HubBox Configuration - HubBox configures the
extensionRules.bailoutconditions in your store's backend settings. - Testing - Thoroughly test various cart scenarios (eligible products, ineligible products, mixed carts, different countries, values, and weights) to confirm the rules behave as expected.
Shipping Rate Filtering (via Delivery Customisations)
The HubBox app creates a Delivery Customisation Function when you configure rate filtering in the admin panel for the App Block launch experience. If you need more complex filtering logic, your developers can create or edit this Function directly. It receives cart and destination details and returns a list of shipping rates to hide.
DeliveryDefense Configuration (US Only)
This feature integrates UPS's DeliveryDefense service, which provides an address confidence score (High, Medium, or Low) for US shipments to help assess delivery risk.
When enabled, the HubBox app retrieves the score from UPS for US orders and adds it to the Shopify order as:
- Tags — e.g.,
DeliveryDefense risk level: High,DeliveryDefense risk level: Low - Note Attributes — e.g.,
delivery_defense_score 727
For more information, including how to set up an Access Point shipping rate discount for high-risk home deliveries, see the DeliveryDefense documentation.
Testing the Integration
Before going live, verify the following:
- App Block — Does the HubBox App Block appear correctly in the Checkout Editor and live preview? Is it positioned correctly?
- Map — Does the map load correctly? Test searching for locations, selecting a point, and confirming the selection.
- Address Update — Does selecting a pickup point correctly update the Shipping Address fields in the Shopify checkout form?
- Shipping Rates:
- Toggles/Buttons: Do rates filter correctly when switching between Home Delivery and Pickup?
- Shipping Rate Method: Does the correct HubBox rate appear alongside home delivery rates for eligible addresses?
- Eligibility Rules — Test carts with eligible and ineligible items to confirm the rules behave as expected.
- Test Orders — Place test orders using HubBox pickup and verify:
- Correct tags are applied.
- Note attributes (
collectPointId, etc.) are present. - The final shipping address on the order is the pickup point address.
- (US only) DeliveryDefense tags and attributes are present.
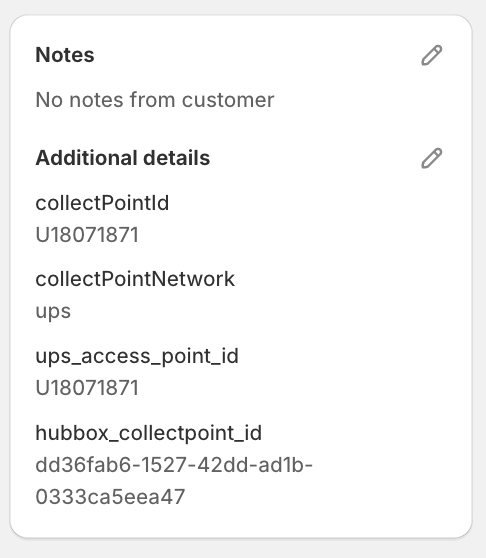
How Pickup Orders Appear in Shopify
When an order is placed using HubBox pickup, the following data is added to the Shopify order:
- Shipping Address — Updated to the address of the selected pickup point.
- Tags — Carrier-specific tags to identify the order (e.g.,
UPS Access Point,DPD Ship to Shop,DHL Parcel Pickup). - Note Attributes (Additional Details):
collectPointId— The unique ID of the chosen location.collectPointNetwork— The carrier network key (e.g.,ups,dpd,dhl).collectPointName— The name of the pickup location.delivery_defense_score(US only, if DeliveryDefense is enabled) — A confidence score between 0 and 1000.
- DeliveryDefense Tags (US only) — e.g.,
DeliveryDefense risk level: High,DeliveryDefense risk level: Low.